PROOF Troubleshooting
Edit this Page via GitHub Comment by Filing an Issue Have Questions? Ask them here.For users that have a well-tested and established WDL workflow, the PROOF How-To documentation should provide enough guidance to help a user through a typical process of job submission. However, while developing a new and untested WDL workflow, it’s common to run into all sorts of issues, some as simple as typos, others as complex as entire software environments. The goal of this guide is to teach users where to find (and how to interpret) the more advanced features and behaviors of PROOF in order to debug their custom WDL scripts and get their research up and running.
Common PROOF Server Issues
Make sure your PROOF server is up and running
- By default, PROOF servers run for seven days before they shut down automatically. If submitting/validating a workflow produces an error message like “Your server is not up!”, you’ll need to start up another PROOF server via the “PROOF Server” tab. Analysis jobs in progress will not be affected by the restart and all previous job history will be saved.
- If you just started your PROOF server, and received this message, the server may need additional time before it can communicate with the app, wait 1-2 minutes and try again.
- If the screen is grayed out and you’re unable to press buttons at all, your browser has timed out. You’ll need to refresh the page and log in again.
Try stopping and restarting your PROOF server
- Occasionally, our product team will push updates to the underlying repositories of PROOF to fix issues and add functionalities. However, only servers created after the update will get that added/fixed functionality.
- If your server has been running for a few days, it is definitely worth stopping and restarting your PROOF server. If any recent updates have been pushed, your new server will pick them up and hopefully that will fix your issue. And even if nothing’s been updated, always worth trying the old standby of “turning it off and on again.”
Workflow Level Issues
Validate your workflow
- Before submitting a job, validate your WDL script and an input json via the “Validate” tab in PROOF. This will catch typos and larger structural issues in your script. Ideally, you should see something to the effect of
$valid [1] TRUE, but here are a few of the non-ideal scenarios:- Variable typo in the WDL: Let’s say I accidentally referred to a variable called
bedfileasbedFileat some point later in the workflow. Since WDL is case-sensitive, the validation step should throw an error that looks like the screenshot below. Specifically, it will call out the mismatched variable by name (Cannot lookup value ‘bedFile’) and provide a list of alternatives defined in the script.

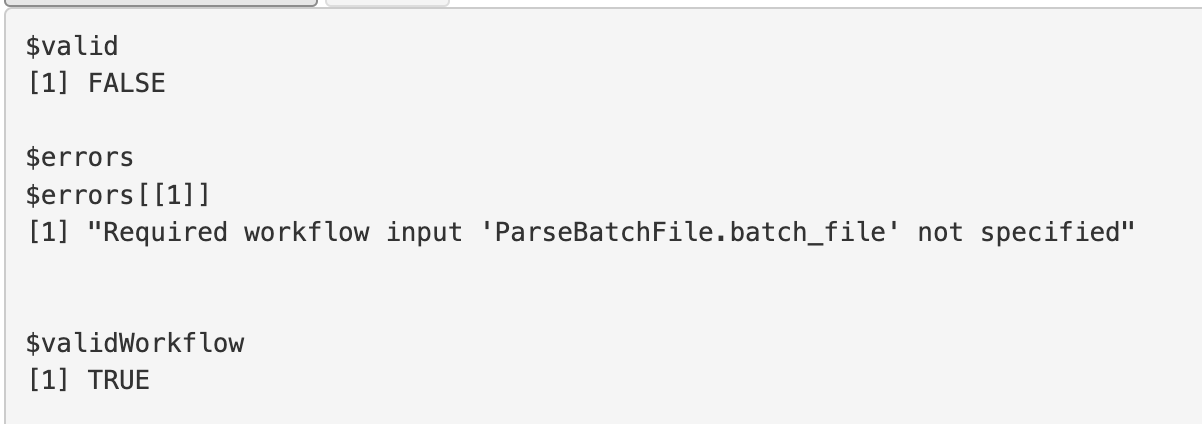
- Variable typo in the input json: what if I accidentally referred to a variable called
batch_fileasbatchFilein the input json? As seen in the screenshot below, the validation results will specify that a required input is missing and also clarify that the workflow itself is valid (i.e.$validWorkflow [1] TRUE).
- File path typo in the input json: let’s say I accidentally point the
batch_filevariable in the input json to/path_to_inputs/inputs.tsv, when it’s actually located at/path_to_tsvs/inputs.tsv. Or maybe I accidentally put the relative path instead of the absolute path, e.g.inputs.tsv. Unfortunately, the validation feature only checks for WDL syntax errors, not whether a provided input will actually run within a given task. So in this case, the typo would slip past the validation step and the logs would indicate that the WDL script and input json are valid. Only upon actual submission of the workflow will this issue be identified (see below for tips on this scenario). - Missing closing bracket in workflow/task: let’s say that in all of my development enthusiasm, I forgot to put a closing bracket on one of the sections of my workflow and/or task. The resulting validation message should say something to the effect of
ERROR: Unexpected symbol (line ##, col #)… Expected rbrace, got <something else>. If you navigate to the line in question, the missing closing bracket should be a few lines above that.

- If you see any unique messages besides these ones, please send us a screenshot at wilds@fredhutch.org or schedule a Research Computing DHC with the DaSL staff. We’ll help work through it with you and add it to the list!
- Variable typo in the WDL: Let’s say I accidentally referred to a variable called
Workflow aborted unexpectedly
If you encounter a scenario where your validated workflow is unexpectedly aborted here is how you would troubleshoot for different use-cases: 1. Missing inputs: In this case you may have syntactically defined your input in the workflow however these inputs may not be available or accessible. In this case, in PROOF you will see in your workflow/workflow_id/task/execution/stderr file this message: “slurmstepd: error: * JOB XXXXXXXX ON gizmoXX CANCELLED AT year-month-dayThh:mm:ss ***”. This is a special feature of PROOF and lets the user know that either they don’t have access to specific files required as inputs in this task or the file path given may not be accurate. 2. **Output storage issues: Another reason that your workflow fails to start could be if you do not have write permissions in the specified output directories. So evethough it might validate if you do not have write permissions this could cause your workflow to fail.
Task Level Issues
Identify which task failed
- Start by navigating to the “Track Jobs” tab of PROOF and click “Update View” to produce a list of recent jobs run via PROOF.
- Scroll down to the “Workflows Run” table and click on the job in question. This will populate the “Workflow Specific Job Information” tables further down in the browser.
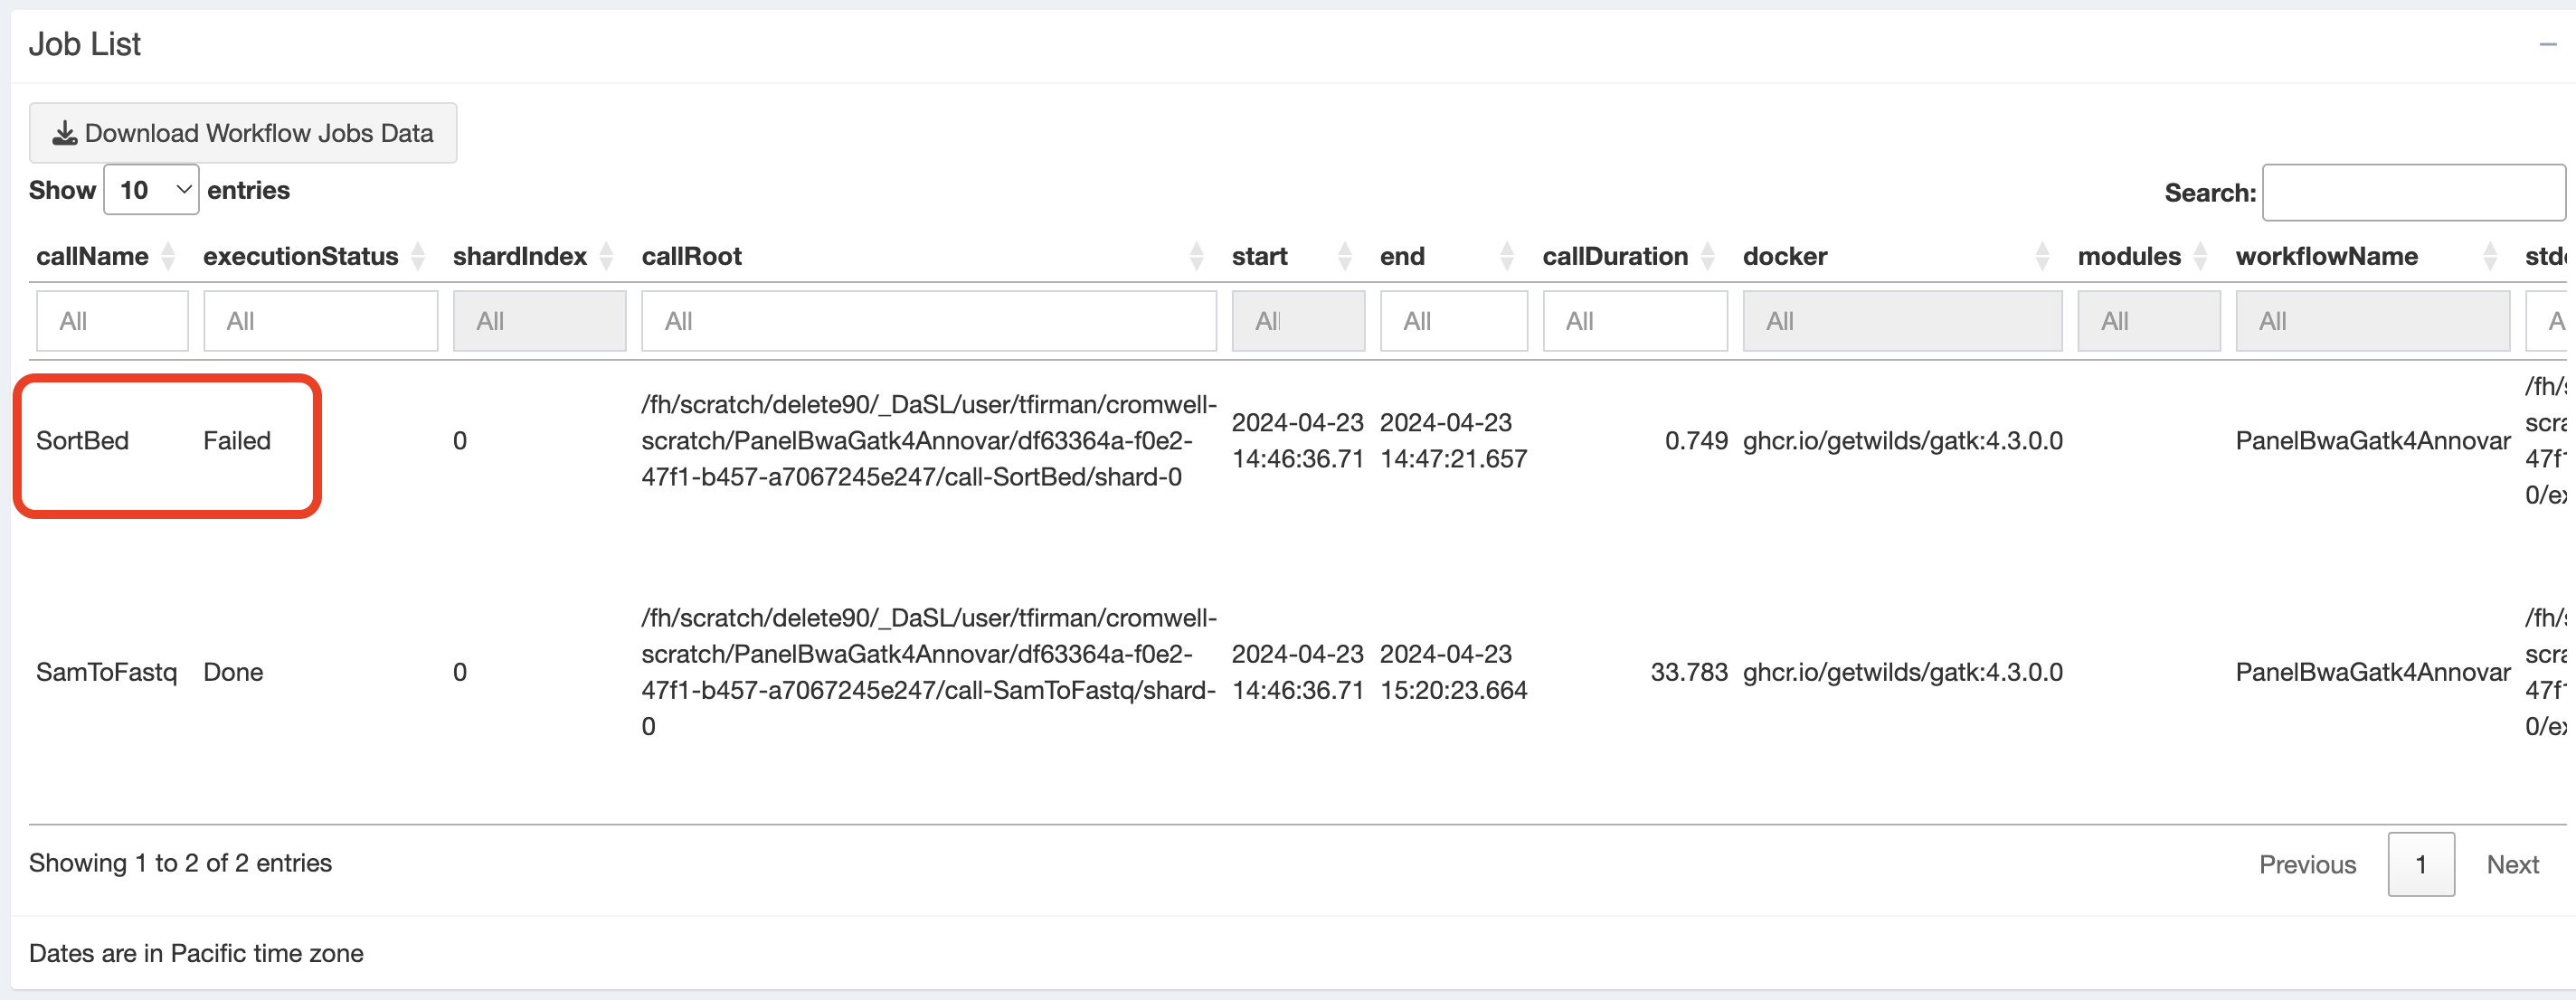
- Scroll down to the “Job List” table and identify which specific task(s) failed within the workflow in question. This will narrow down your issue to a particular task and the table itself will provide information that will be useful in your troubleshooting endeavors.
Identify why the task failed
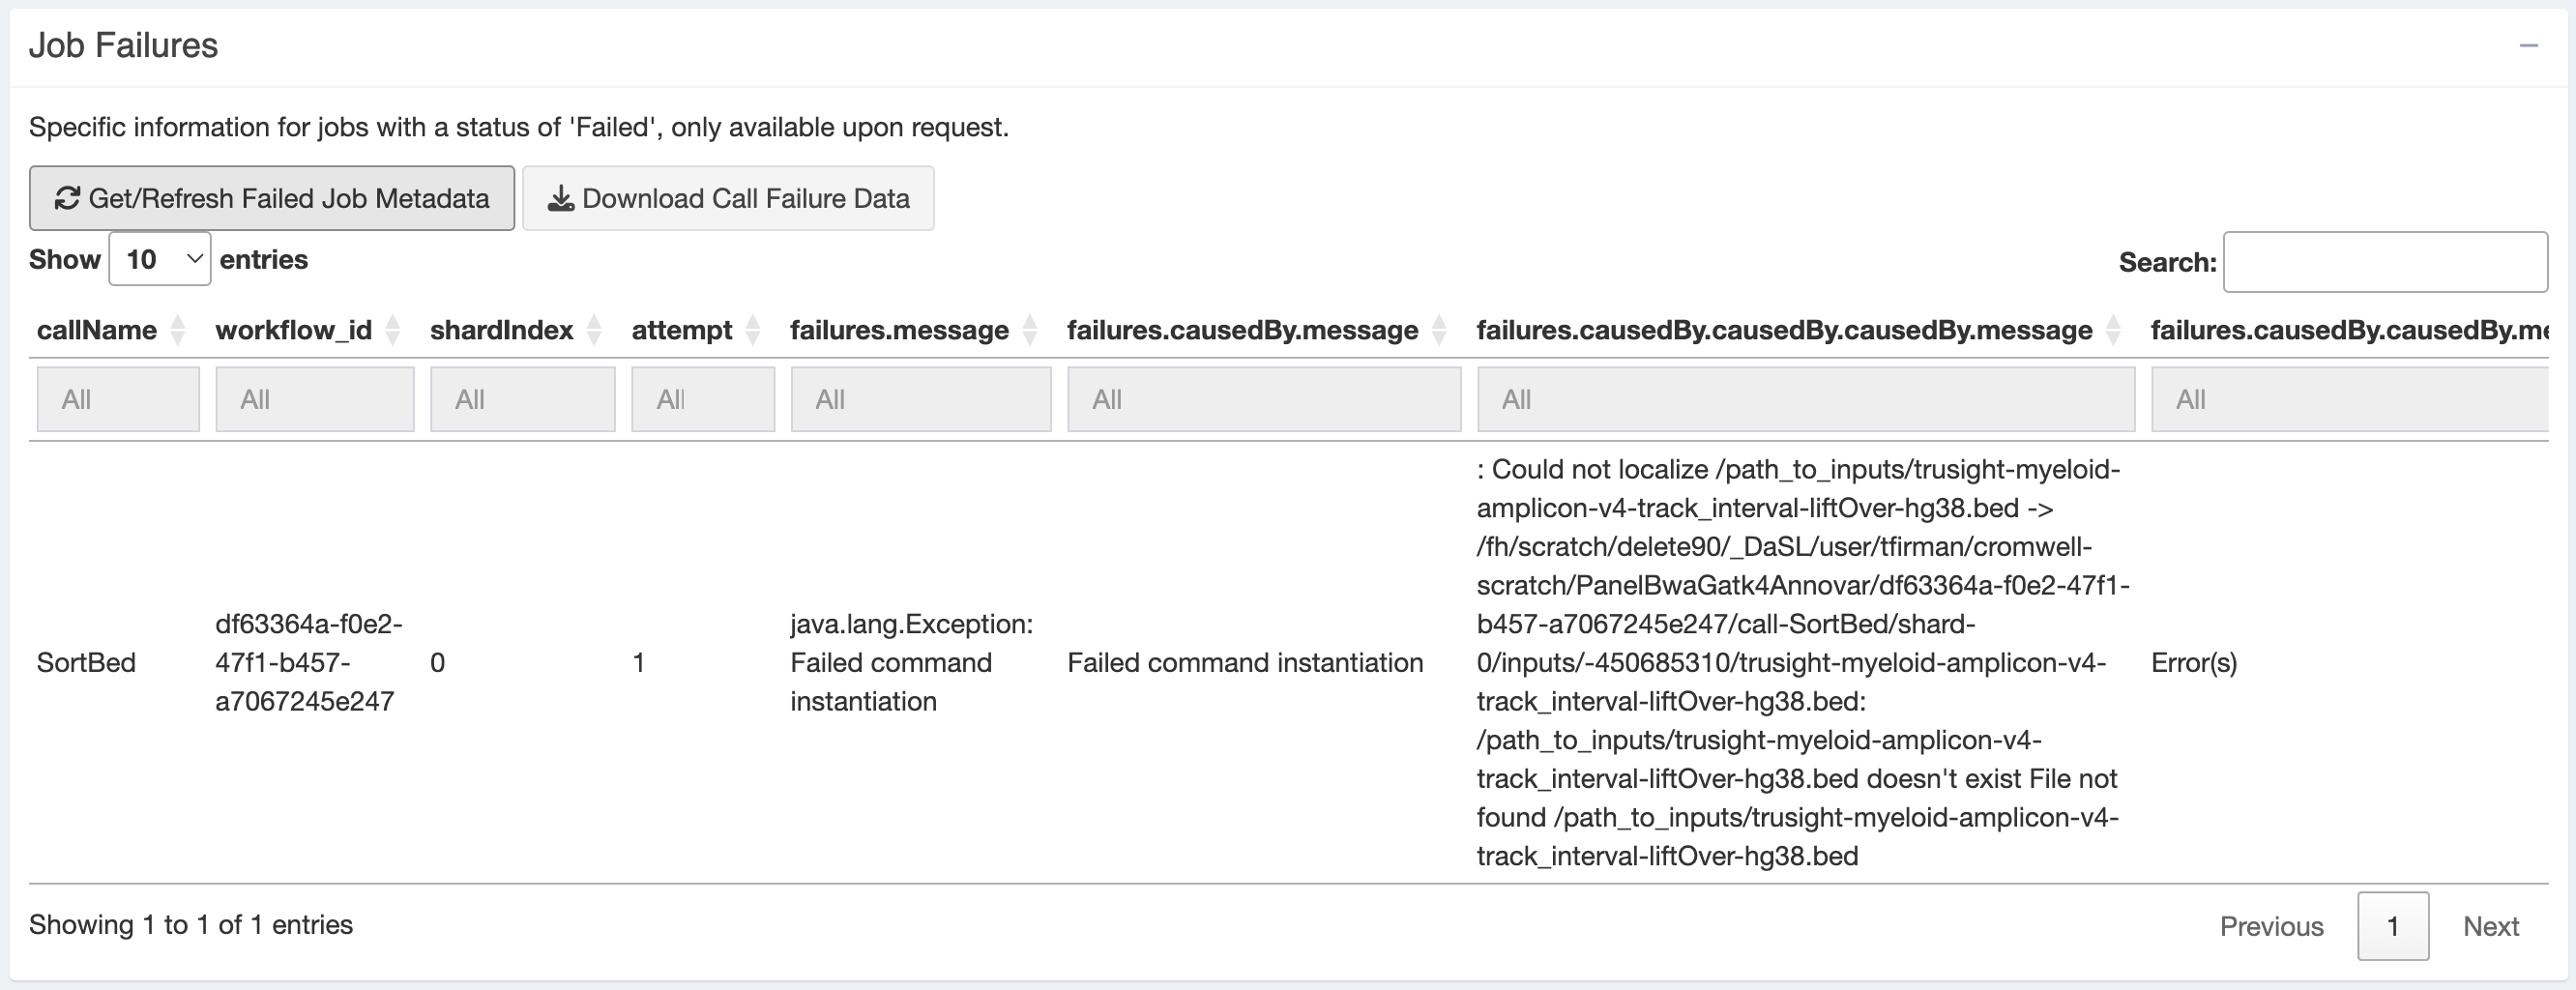
- If you scroll down even further, you’ll notice a “Job Failures” table. Click “Get/Refresh Failed Job Metadata” to populate the table with details about your failed task. The
failures.causedBy.messagecolumns are of particular interest as they contain the error messages produced by the tool used within the task itself. In this example pictured below, I provided an erroneous path for one of my inputs, and as you can see, the tool “could not localize” it:
- If these messages don’t provide enough information, navigate back to the “Job List” table and take a look at a few additional columns:
- stdout & stderr: these columns contain the location of flat files that contain the output and error messages from the command line tools used during the task(s) in question. These will help to provide tool-specific feedback as to what might be going wrong. To access these, copy the path provided, log on to Rhino, and view the text files via
more,less, orcat. - commandLine: this column contains the exact command that was run during this task. Check to see if anything looks off, maybe an improper string concatenation, maybe a reference to the wrong WDL variable. If so, navigate to the “command” section of the task to see what might be causing the issue.
- docker: this column contains the name of the Docker container that was used in the task. First, check for typos, but if the image name and version tag appear to be correct, try pulling the container locally using Docker (or Apptainer on Rhino/Gizmo). If it pulls successfully, try running exactly what is written in the commandLine column within the container.
- stdout & stderr: these columns contain the location of flat files that contain the output and error messages from the command line tools used during the task(s) in question. These will help to provide tool-specific feedback as to what might be going wrong. To access these, copy the path provided, log on to Rhino, and view the text files via
Execution Issues
Check the workflow metadata
- If these resources still don’t provide any sort of illumination, go back to the “Workflows Run” table and copy the workflow ID number via the “copyId” column. Navigate to the “Troubleshoot” tab of PROOF, paste the workflow ID into the “Troubleshoot a Workflow” section, and click “Get Complete Workflow Metadata”. This should display a large unformatted json, mostly containing the same information as the tables mentioned above, but it could contain a detail that was missed by PROOF’s user interface.
- Along the same lines, you can also look into the raw workflow log produced by your underlying PROOF server. To do this, identify your workflow log directory on the “PROOF Server” tab (see screenshot below) and navigate to that directory on Rhino. Once there, you will see a collection of files following the naming convention of
workflow.[workflowid].log. Open the logfile corresponding to the workflow in question using your text viewer of choice (more,less,cat, VS Code) to see details about the Cromwell execution of your WDL script.

Abort an incorrectly submitted workflow
- Let’s say you realize in the middle of a running workflow that you forgot to update one of the values in your input json. The rest of the run will produce inaccurate/irrelevant results and you want to cancel that run so as not to waste time and resources.
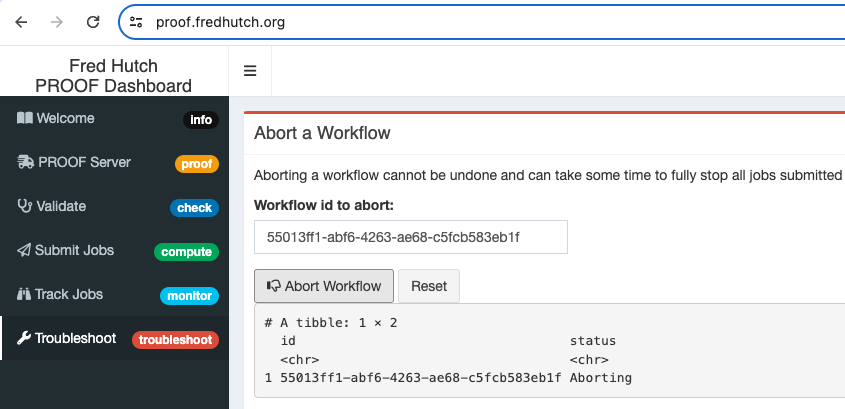
- Navigate to the “Workflows Run” table in the “Track Jobs” tab and copy the workflow ID number via the “copyId” column. Then switch to the “Troubleshoot” tab of PROOF, paste the workflow ID into the “Abort a Workflow” section, and click “Abort Workflow”.
- You should see a message pop up describing the workflow’s status as “Aborting” (see screenshot below for example) and the status for the job in the “Workflows Run” table should change from “Running” to “Aborting” to “Aborted”, signaling that the run in question has been successfully cancelled.
Always reset forms during validation/submission
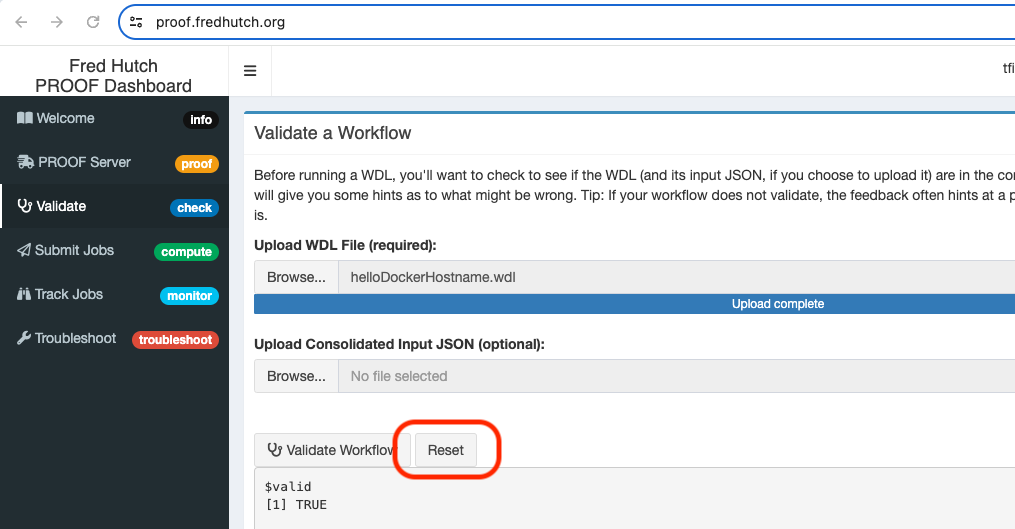
- If you decide to validate/submit another workflow during the same login session, the previous values will initially remain in the form. You can still select a different file using the “Browse” button, but it is very easy to forget to update all fields, in which case PROOF will just use the previous value.
- We highly recommend clicking the “Reset Form” button to clear previously existing values from all fields (see screenshot below). This will allow you to start from scratch and be confident that you are validating/submitting the latest version of your workflow.
Docker Container Issues
Creating your own Docker image
- If you’re creating/troubleshooting your own Docker image and you push an update to the same version tag, you’ll need to clear your Apptainer cache for PROOF to download a new copy of the image. Otherwise, PROOF will just reuse the previous cached version of the image, therefore not incorporating your changes.
- To remove the cached images, start by identifying your Apptainer cache directory at the bottom of the “PROOF Server” tab of PROOF (see screenshot below). Navigate to that directory in Rhino and delete all files in that directory ending in
.sif.- Don’t delete the entire directory. PROOF needs it to function properly and will not be able to properly submit jobs without it. If that does happen, you can recreate the directory by stopping and restarting your PROOF server.

- DaSL also has a collection of images for commonly used bioinformatics tools in the WILDS Docker Library and we are always looking to expand it. If you think the Fred Hutch community would benefit from a new tool in this container library, please feel free to reach out to us at wilds@fredhutch.org or schedule a Research Computing Data House Call to talk through things in person!