Computing Resource Access Methods
Individual staff member’s desktop computers themselves are supported by Center IT (ADM, CRD, VIDD) as well as Division IT groups (BSD, HB, PHS). Please see Center IT’s page in CenterNet about Laptops and Desktops for more information about support for desktop computing.
Note: If you request a Linux Desktop, Center IT will recommend that you use NoMachine from a Windows or Mac system instead as this is the most appropriate choice for most users.
For help with mobile devices, please see Center IT pages for more information on Mobile Device Services or contact Help Desk with questions or problems.
Using these desktop computing resources, the following describes how to access additional computing resources at the Hutch.
Open OnDemand
Open OnDemand provides a user-friendly web interface to the cluster. It features file management, a browser-based terminal, and interactive applications such as RStudio and Jupyter. See Open OnDemand for details.
SSH Clients for Remote Computing Resources
We use two common protocols to access remote compute resources. The first is the Hypertext Transfer Protocol (HTTP). This is the way your browser communicates with remote web servers. The second common protocol is Secure SHell (SSH). This is the method used to run a program on a remote server. Typically the program run is a shell that gives you an interactive command line on the remote host.
Many programs you will want to run on a remote compute server are command line programs. These are easily executed from your shell remote process. You use this method when opening a terminal (shell) on your computer to connect to a remote compute server (like rhino) and typing the name of the program or script.
Note:
rhinorefers to three locally managed servers that function as a data and compute hub for a variety of data storage resources and high performance computing (HPC). More information aboutrhinoand other computing technology at Fred Hutch is available in the Large-Scale Computing section of this wiki.
You may also need graphical output (GUI) to use tools like R Studio or advanced text editors. If the remote program has a Graphical User Interface (GUI) then you use a Windows-like system called X (or X11 or XOrg or officially The X Window System). The X Window System is backward from the way you may think it works - what you run on your laptop or desktop is actually the X server, and the remote program you want to display on your device is the client. All SSH clients support tunneling the X traffic, so usually you will use SSH to start the remote GUI program, which is then displayed on your device.
This is a list of clients and servers by OS:
| OS | SSH client and command |
X server | Availability |
|---|---|---|---|
| MacOS | OpenSSH ssh |
XQuartz | OpenSSH is already installed on MacOS |
| Linux | OpenSSH ssh |
Xorg | Already installed on supported Ubuntu systems |
| Windows | PuTTY PuTTY |
Windows Subsystem for Linux | Can be installed through “Software Center” |
Windows
PuTTY
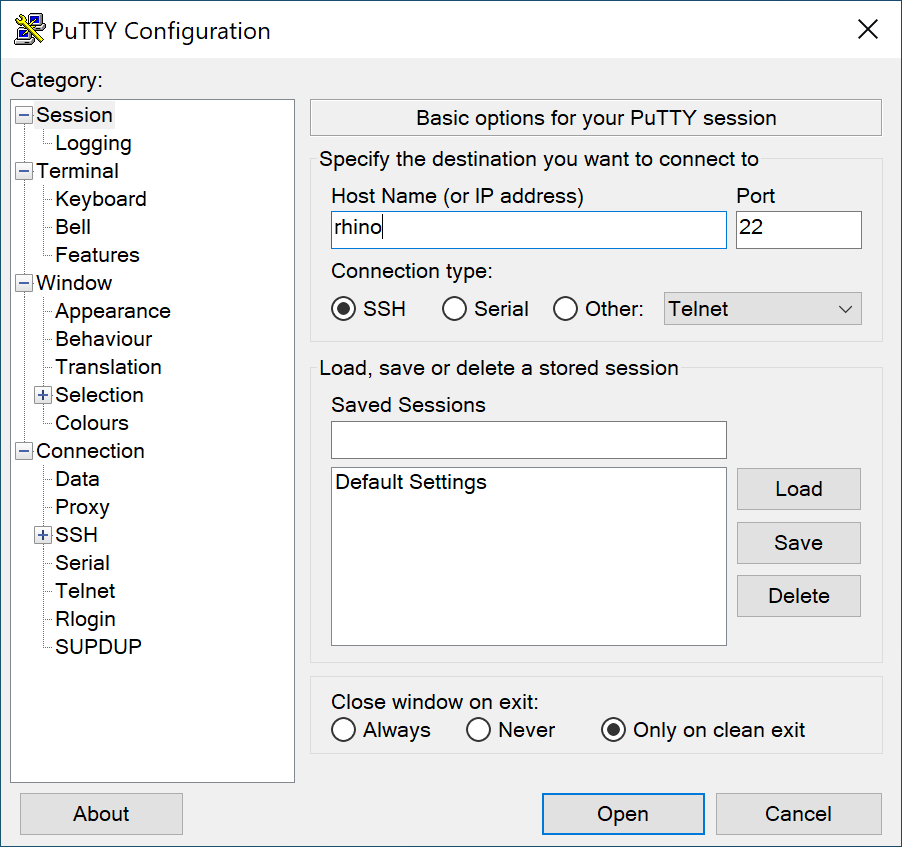
PuTTY is the most widely used secure shell software for Windows. You can install PuTTY through “Software Center”. To connect to rhino using password authentication refer to the screenshots below.
Open the application, enter rhino as the hostname then click Open.
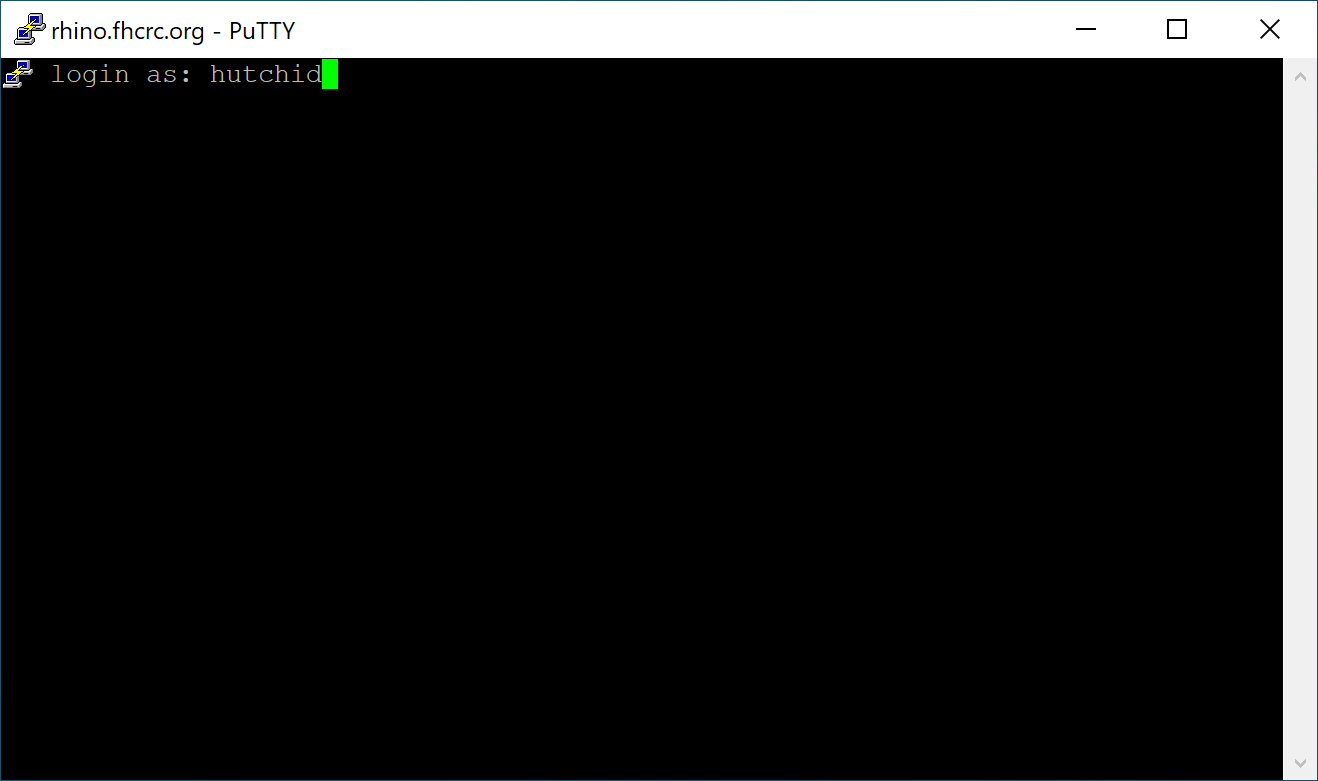
Enter your hutchid then press enter. It will prompt for your password. Press enter again and you will connect.
Command Prompt (cmd.exe)
Command Prompt, also known as cmd.exe or cmd, is the default command-line interpreter on Windows. You will need to complete the steps under Additional configuration steps before using this application. When complete, use ssh rhino to connect.
Windows Terminal
Windows Terminal is a modern terminal application with powerful features including multiple tabs. It can be installed from the Microsoft Store. You will need to complete the steps under Additional configuration steps before using this application. When complete, use ssh rhino to connect.
Additional configuration steps
If you want to use something other than PuTTY on Windows, you will need to complete these additional configuration steps.
Install OpenSSH Client
The ssh command on Windows requires OpenSSH Client which is not installed by default. To check, open Command Prompt or Windows Terminal, type ssh and press enter. If you get a message like 'ssh' is not recognized as an internal or external command, operable program or batch file. then you will need to e-mail the Service Desk and request installation of the “OpenSSH Client optional feature”. They can connect to your computer and do this remotely.
Create ssh config file on Windows
When you launch Command Prompt, you should be at your user profile folder. If not, type cd C:\Users\<HUTCHID>. Next, create a folder called .ssh with mkdir .ssh. You might get a message saying the folder already exists. Use a text editor to create a file in this location if it doesn’t already exist. Here is an example of a minimal ssh config file. For more information about this file see advanced ssh config options. Note that on Windows you will need to specify the MAC algorithm(s).
Host rhino
  User <HUTCHID>
  MACs hmac-sha2-512
Mac OS
The default Mac terminal is a good choice for connecting to and using SciComp Linux-based resources. We also recommend using iTerm2 for your local terminal program on your Mac. It has a richer feature set that comes in handy as your computing needs grow.
The only X11 client for Mac is XQuartz. Install XQuartz before running any Linux X11 apps such as RStudio or Matlab. Go here, and download and install the latest version of XQuartz.
After installing XQuartz just start the app. The XQuartz icon will appear in the toolbar showing that it is running. XQuartz is now running an X11 client and that is the only interaction that you need to do with XQuartz. After XQuartz is running, open the Mac terminal. The latest version of XQuartz sets the DISPLAY environment with the default Mac terminal window. We do not recommend using the terminal that comes with XQuartz.
When connecting to a rhino with ssh always use the -Y flag to forward your Xsession to your Mac.
ssh -Y HutchID@rhino
(Replace HutchID with your HutchNet ID)
After connecting to a rhino verify that your X11 client is working by typing xeyes.
Linux
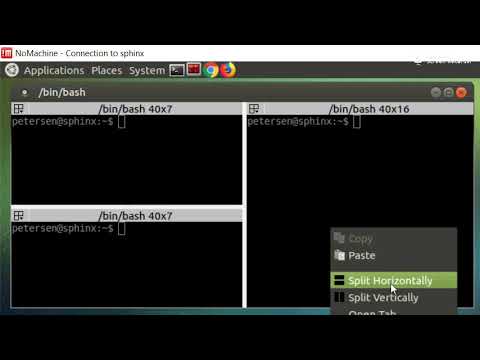
Terminator is a convenient terminal emulator that can have multiple terminals in a single window. You can use Terminator on your Linux desktop. Windows and Mac users will need a X11 software to use SciComp resources as graphical desktop. We recommend NoMachine to connect to a Linux machine with Terminator.
After starting Terminator you can right click on the terminal window and either split it horizontally or vertically. This 1 min video shows you how it works:
SSH Connections
SSH uses the TCP network protocol to make connections between systems. TCP is a persistent, stateful connection that is resilient to network interruptions. When you use SSH to run a program on a remote system (even a shell) the connection you make is tied to an SSH process on the remote machine, and all programs are children of that SSH process. If that process stops, all children stop as well. If the network connection does drop between your client and the server, your SSH process stops, and all your running programs stop.
There are several ways around this:
- NoMachine - you can use the NoMachine service
- GNU Screen or tmux - these utilities run a separate process on the remote host that is not tied to your SSH connection
- Cluster jobs - you can run your programs using our slurm cluster, which queues and executes programs independently of your SSH connection. This is best for non-interactive tasks, such as executing scripts that run from start to finish
NoMachine NX (Multi-OS)
NoMachine NX is a remote desktop software for Linux servers that gives you full remote access to a graphical user interface from Windows or Mac clients. It is installed on the SciComp session Servers rhino01, rhino02 or rhino03. NoMachine requires that your are connected to the Campus network- either through the local Fred Hutch network or through a VPN connection.
To use this service, download and install the NoMachine Enterprise Client from NoMachine’s site. Windows users can also install from “Software Center”.
Installation and configuration is described here.
One of the nicest features of NoMachine is that you can disconnect from the server’s desktop environment and later resume the connection and continue right where you left off with all terminal windows in the same place. NoMachine from Windows or Mac is often a better choice than installing a Linux desktop.
Screen and tmux
GNU Screen and tmux are both terminal multiplexers. They run one or more shell processes on a remote system and enable you to disconnect and reconnect while leaving the process(es) running. They are both full-featured utilities that take a longer time to learn, but provide a useful set of features that aren’t available with simpler tools. Using the command below, you can get working with tmux quickly.
- Use SSH to connect to a remote system:
ssh rhino - On Fred Hutch systems, load the tmux environment module:
module load tmuxor justml tmux - Start a tmux session by entering
tmux, or attach to your running tmux session usingtmux attachor justtmux a - When in a session, typing
exitorctrl-dwill exit the tmux session - Closing the lid of your laptop and/or exiting your local ssh client will leave the tmux session running
- Explicitly disconnect with
ctrl-b d(ctrl-b puts tmux into command mode, and the disconnect command is d)
A note about tmux iterm2 integration. If you are using iterm2 on a Mac, add -CC to your tmux command. This will run a tmux console as well as tmux in that terminal. From there, you can use iterm2 commands to create a new tmux sessions in a new window (command-n) or a new tab (command-t). When you disconnect, simply reattach to that first tmux session, and iterm2 will re-open all your windows and/or tabs.
A note about the X Window System and terminal multiplexers. As stated above, on your laptop you are running an X server, and the remote program is a client. Terminal multiplexing allow your laptop to disconnect because the multiplexing server is running on the remote system and your device is the client. When you close your laptop, the X server stops. Clients exit at that point as a client cannot do anything without a server. See NoMachine for a workaround for X programs.
A note about screen: ssh rhino will assign you to one of the available, specific servers (ie: rhino01, rhino02, rhino03) and screen instances are not shared across the servers. If you are interested in using screen to run a persistent session on the rhino cluster, consider:
- accessing a specific server directly eg:
ssh rhino01 - making note of which server you have logged into by
ssh rhinoand then log directly into it on your next session.Advanced/Optional Setup for Making Things Easier: The SSH config file
Located in your home directory in the
.sshfolder is a file calledconfig(create it if it doesn’t exist). Your SSH client will read configuration options from this file when you use it. Any of the command line options can be specified in this config file to avoid overly complex SSH commands and make frequent use of remote servers more straightforward.
Usernames
Sometimes the local user on your client device is not the same as your username on the remote system, or you have a different identity/user on a remote system. You can always ssh joeuser@remotehost.com but you can also specify the alternate username in the config file.
| Config | Command Line | Value | Notes |
|---|---|---|---|
| User | Your remote system username | Make ssh commands shorter and easier. | |
| Identity | -i | SSH supports multiple identities and multiple keys. Use this option to specify a different SSH key from the default ~/.ssh/id_rsa. |
Keys
If you use your password to ssh, you can certainly continue to do so. However, with a key you will have to type your password less frequently, or sometimes never. Many remote systems do not allow password authentication and require the use of keys.
Key Generations and passphrases
Create an SSH key - on MacOS or Linux, run ssh-keygen and follow the prompts (change the file location if you are creating a new key but want to keep the old one). On Windows you will need puttygen if using PuTTY or follow the Linux instructions if using Cygwin.
You will be prompted to enter and then confirm a passphrase. This is the best protection of your ssh key, and should be a longer complex passphrase. Passphrase-less ssh keys are a security violation. See below for ways to automate local unlocking of your key to avoid having to use a complex passphrase frequently.
For extra points, read all about public key cryptography (it is very cool!).
Key distribution
You can copy your public key in any way you like. You can even cut-and-paste the key contents if that is easy. On Mac and Linux there is an auxiliary ssh command called ssh-copy-id which will copy your default public key to a specified remote system (asking for your password to make the ssh connect to transfer the key).
ssh-copy-id HutchID@rhino
(Replace HutchID with your HutchNet ID)
On Windows it is easiest to cut-and-paste the key into a remote session opened using a password.
Passphrase management
No one wants to type a long passphrase every time they use SSH. Creating an SSH key with no passphrase is unsafe. There must be a better way… .
MacOS Keychain
The following steps will get your MacOS device into a state where your SSH key passphrase is unlocked for you when you log into the Mac, and is automatically supplied to SSH. You will need to be logged in to your Mac, have a terminal open, and have an SSH key to start.
- Add your ‘key’ to the keychain - If you are using MacOS 12 or newer, run
ssh-add --apple-use-keychain <path to keyfile>. If you are using MacOS 11 or older, runssh-add -K <path to keyfile>. The default path to keyfile is~/.ssh/id_rsa. This will prompt for your passphrase, and then store it in your login keychain. - Configure your Mac to always use the keychain for your ssh key passphrase by adding the following to your (
~/.ssh/config) file:Host rhino UseKeychain yes AddKeysToAgent yesWindows/PuTTY
On Windows, PuTTY can include a key management agent called pageant.exe - you can download PuTTY easily without it and can download it separately from the PuTTY site.
Good key management
Your SSH key is actually in two parts - the public key, and the private key. Public/Private key pairs are fascinating if you are in to encryption. Be sure to search and read all about them.
Public Key
Your SSH public key is not secret. It can and should be distributed. Typically your public key is added to your ~/.ssh/authorized_keys file (just add it to the end). Also, if there is a public key file in ~/.ssh on the remote system, that will work. You can email this, paste it, whatever. The trust is on the other end - any remote system that accepts your public key in agreeing that it identifies you.
Private Key
Protect this. This is how you prove you own the public key. It is best to not put this anywhere other than your client device, and perhaps a backup if you like, though no lasting encryption will be done with it, so losing it will not destroy any data.
Best Practices
The best practices involving keys include:
- limit copies of your private key (there should be only one)
- do not enter a blank passphrase
- add your public key (cut-and-paste is fine) to
~/.ssh/authorized_keysfile (seessh-copy-keyabove) - you do not need to put both of your keys on every machine you want to use, only your client device
Agents
SSH supports an in-memory agent process that will hold your unlocked private key safely. This alleviates the need to type your passphrase for the duration of time the agent is running. See above for MacOS options. On Linux, you can run eval $(ssh-agent) to start an agent, and ssh-add [path to keyfile if not default] to add your key to the running agent process. On Windows, you can run PuTTY’s pageant.exe.
You can forward key requests from remote machine back to your running agent:
| Config | Command Line | Value | Notes |
|---|---|---|---|
| ForwardAgent | -o ForwardAgent | yes/no | Forward agent requests back to the agent running on your client device. |
Remote Access
SSH supports using a proxy or “jump host” and can be configured to do so automatically.
| Config | Command Line | Value | Notes |
|---|---|---|---|
| ProxyJump | -J | hostname | SSH will use the specified host as a middle-point before completing the connection to your desired host. |
Forward X11
You must start from a client that is running an X11 server. These include any supported Ubuntu Linux system, XQuartz on Macos, and NoMachine.
| Config | Command Line | Value | Notes |
|---|---|---|---|
| ForwardX11 | -X | yes/no | This will instruct your ssh client to set up a tunnel between the X11 server on your client device and a port on the remote machine. This port is specified by the DISPLAY environment variable. |
| ForwardTrustedX11 | -Y | yes/no | Trusted X11 connections bypass X11 security features. The traffic is all still encrypted, but root on the remote machine may be able to access your client device. Some SSH implementations do not support X11 security extensions, so you must specify -Y or ForwardTrustedX11 to bypass them. |
Check on the remote system that you have a DISPLAY environment variable set using echo $DISPLAY and test X11 itself by running a simple X11 program like xeyes.
All Together Now
Your SSH config supports multiple ‘stanzas’ to help you as your config may not be the same for remote hosts. The ‘stanza’ keyword is Host. In the example below, everything from one Host line to the next Host line is applied the specified host.
Host *.fhcrc.org
	UseKeychain yes
	AddKeysToAgent yes
	IdentityFile ~/.ssh/id_rsa
	ForwardX11 yes
	ForwardX11Trusted yes
	ForwardAgent yes
   	User <username>
SSH does not do DNS resolution before consulting the config file, so typing ssh rhino (or any short hostname without domain) will not trigger the *fhcrc.org Host entries. You can add rhino to the Host line to have this trigger the config as well.
Access From Outside the Campus
The campus network is protected by a firewall which prevents connections from the wider Internet to FHCC compute resources. For remote connections FHCC IT provides a VPN agent that creates a tunnel from your workstation into the campus network allowing you to use FHCC compute resources as if you were connected to the campus network.
The VPN client is only available on Hutch managed (imaged and installed) devices and requires a HutchNet ID to log in. For assistance and help with the VPN you can contact the IT Service Desk (see also the VPN page on CenterNet.)